Tag Archives: dessert

Green Tea Coconut Cake and Mango with Sticky Rice

30 Aug

Asian desserts are my absolute favorite, they have the most unique blend of flavors and ingredients and more often than not always incorporate fruit. Absolutely nothing satisfies my taste buds more than Mango with Sticky Rice, I could live on that stuff forever! So, I decided to do a Thai dessert post as we bid Summer farewell and head into Fall. (Although, I will most likely still be eating Mango with Sticky Rice in the dead of winter!)  Both of these desserts are very simple and light on the sugar but trust me,  you will be licking your plate afterwards!!!

This cake was light, moist and AMAZING! I’m crazy for coconut and green tea, so I was super excited about baking this… I got the recipe from thaifood.about.com and made a few very minor alterations.

GREEN TEA-COCONUT CAKE

Ingredients

  • 5 eggs separated
  • 3/4 cup white sugar
  • pinch sea salt
  • 1/2 cup olive oil
  • 1/3 cup coconut milk (the thick canned stuff! Not the refrigerated watered down stuff!)
  • 1 tsp. pure vanilla extract
  • 2 tsp. baking powder
  • 1 cup white flour
  • 3 tsp. green tea powder, such as Japanese “maccha” (look for this at health food or Japanese import stores)
  • Dry shredded coconut (the type used for baking)
  • Powdered sugar

  1. Preheat oven to 350 degrees. Prepare an angel food cake pan (or a 9-inch cake pan), either by greasing it well, or lining it with parchment paper.
  2. Crack eggs into 2 separate mixing bowls, with the egg whites in one bowl and the yolks in another.
  3. Beat the egg whites until stiff, and set aside.
  4. Add the salt and sugar to the yolks and stir well until smooth.
  5. Add the coconut milk, oil, and vanilla to the yolks, and beat until mixed in (or stir it well).
  6. In a 3rd bowl, stir together the flour, baking powder, and green tea powder. Now add (or sift) this into the yolk mixture. Stir well or beat to incorporate. Note: the batter will turn green from the green tea – this is the effect you want.
  7. Now fold in the egg whites, stirring and mixing by hand and just until egg whites have dissolved into the batter (do not over mix).
  8. Pour the batter into the prepared pan and place in the oven for 25 to 35 minutes (depending on your oven). Check cake after 25 minutes by inserting a fork into the center of the cake. If it comes out clean, it’s done. (Note: the center should form a peak – if it is concave, your cake isn’t nearly finished).
  9. While cake is cooling in the pan, toast the coconut. Place coconut in a dry frying pan (no oil) over medium heat. “Dry fry” for 1 minute, stirring constantly – or until coconut turns light golden brown.
  10. Decorate the cake with a sifting of the icing sugar, and add a sprinkling of toasted coconut on top. Serve warm or at room temperature. Enjoy!

annnnnnnnnnnnnnnnnnddd last but not least, my faaaaaaaaaaaaaaaaaaavorite……… And so incredibly easy

MANGO WITH STICKY RICE

2 ripe mangos (they should give when pressed, but not too much!)

14 oz can coconut milk

4 pinches salt

4 tablespoons sugar

1  1/2 cups sticky or sushi rice (dry)

Prepare rice using directions on package. I use Lundberg’s Organic Sushi Rice and I rinse until clear and then soak for 30 minutes. After soaking, I drain well and add 2 1/4 cups of water, bring to a simmer and then cook on low until done! YES! I make my sticky rice in a POT! There are naysayers out there who will tell you it cannot be done, I have proven otherwise.

Peel and slice the mangos. (f you do not know how to do this the Thai way, then a quick Google search will help you out.) Set aside.

Heat your coconut milk in a pot over medium, stir it constantly and let it simmer until heated through. DO NOT BOIL, it can curdle, yuck!  Add your sugar and salt then remove from heat.  Pour some of the coconut milk over the hot rice, just enough to give it a nice coating. Let it sit for a few to absorb the milk…

Spoon some rice on a plate next to some sliced mango and dump more coconut milk on top! YUM!

Don’t forget to enter my CRAZY, AWESOME GIVEAWAY!!!! Scroll down or click here to go to the GIVEAWAY post and find out how you can enter!!!

Cherry Limeade Bars

17 Jul

It’s hot lately and if I still drank soda, I’d go get me a Cherry Limeade from Sonic. If you’ve been around these parts before, you may have noticed that I love citrus, much more so than chocolate and cherry-lime is pretty much a win-win all around.  My favorite part of a Cherry Limeade lies at the bottom of the cup, eating the soda soaked lime and cherry, it’s like a reward for drinking all that soda, I like that.

I’ve been thinking of baking up a Cherry Limeade dessert for a few weeks now and a Google search turned up that Cherry Limeade cupcakes have been done and done and done! So I decided on some bars, it actually bakes up like a cake, so you could easily whip up some frosting for it and serve it like that, but I am not real big on baking cakes and such. I prefer portability and I like dessert that I can hold in my hand!

This recipe is reeeealllly simple and fuss-free. The Cherry pie filling is swirled through the lime batter straight outta the can. Some of it sinks to the bottom and leaves a nice, gooey layer of cherry goodness on the bottom of the bars. Yeah, and the contrast is pretty cool too!  Now, these guys are VERY gooey straight out of the oven, so they need a trip to the fridge (or freezer) before you serve them.

Without further ado, let me present to you, my recipe for Cherry Limeade bars…


CHERRY LIMEADE BARS

Yield: 2 Dozen bars or 9 x 13 cake

2 cups all purpose flour

1 tsp baking powder

1 tsp baking soda

1 tsp salt

1 1/2 cups sugar

3 oz package lime gelatin

1/2 cup canola oil

2 eggs

1 cup milk

2 tsp vanilla extract

1 tbsp lime juice

21 oz can cherry pie filling

Preheat oven to 350 degrees. Combine the first 6 ingredients in a large bowl.  Slowly add in your canola oil until fully blended then beat in eggs one at a time. Next, add milk, vanilla and lime juice; mix until smooth.  Pour into greased 9 x 13″ pan (I used glass).  Dump cherry pie filling on top in spoonfuls and using the spoon swirl it through the lime batter. Bake for 30-35 minutes or until done.  Remove to rack to cool and then refrigerate until completely cool and firm enough to cut into bars.


You definitely gotta try these if you’re a Cherry Limeade fan, or even if you’re not (you might become one)! Summer isn’t over yet, so bake it up and celebrate!

xox

Britt


Don’t forget to check out my Crazy, Awesome Giveaway! YOU could be the big winner! Click the photo below to be taken straight to the giveaway or just keep scrolling down and enjoy the scenery on your way there. 🙂

Chocolate “Pretzels” and Mini S’mores

9 Jul

They might look like Chocolate-Dipped Pretzels at first glance, but these my friends, are not. These are cookies that are shaped like pretzels, how awesome is that?

The basic cookie is something I dug up from a vintage cookbook and then I decided they were way too boring. I melted some milk chocolate and dipped the fronts and then covered them all that junk. The toppings are kind of donut-inspired because 1. It’s what I had in the cabinet, 2. I was really hungry for donuts yesterday but never got one. 😦

This was a really fun and easy cookie to make and I’m sure all of you have the basic ingredients on hand. The dough is VERY easy to work with, which I love. Be creative with the toppings, clean out your cabinets! Leave a comment below and tell me what you would top your Chocolate “Pretzels” with!

CHOCOLATE “PRETZELS”

Yield: 2 dozen cookies

1/2 cup unsalted butter, softened

1/2 cup sugar

1/4 cup unsweetened cocoa powder

1 egg

1/4 cup water

1 tsp vanilla

2 cups all-purpose flour

Combine butter, sugar and cocoa powder; beat in egg, water and vanilla. Gradually add flour; mix well.

Divide dough into 24 pieces. With hands, roll each piece to a 12-inch rope on lightly floured surface. Shape each rope into a circle, crossing about 2 inches from ends of rope. Twist rope at point where rope crosses. Seal ends of rope to center of opposite side of circle, forming a pretzel shape. Place on ungreased cookie sheet. Bake at 350 degrees for 10 minutes. Cool on rack.

When they cool, top them with whatever your heart desires!

So, this little treat was from last week, but I thought they were so cute, I just had to share.  I bought my kids some mini grahams when I was grocery shopping, the kids were begging for a treat so I pulled them out. Then I remembered I had chocolate chunks and mini marshmallows leftover from the Nice Dreams Cupcakes, so we made Mini S’mores, aren’t they adorable?  Here’s whatcha do:

I put an even number of graham crackers on a microwaveable plate and for each pair put a mini marshmallow on one and a chocolate chunk on the other (if you use chocolate chips, you might need to put 2-3). I microwaved them on high for 30 seconds, when you pull them out the marshmallow should be puffed and ready to explode, if using chocolate chunks it probably won’t be melted but press the two together and they should fuse right away. Enjoy!

DON’T FORGET TO ENTER MY CRAZY AWESOME GIVEAWAY! Scroll down or click HERE to enter and see how you can earn extra entries! The sooner we get to 500 followers, the sooner the three prizes below could show up in YOUR mailbox, so REPOST, REPOST, REPOST!

xox

Britt


Strawberry Lemonade Sugar Cookies

2 Jul

I am officially on a Lemon-Sugar kick and it all started with this…

A heavenly lemon pound cake smothered under a pound of powdered sugar from my favorite local bakery.   Man, was it delicious, me thinks me like lemon better than chocolate!  And so began my quest…

So, I started thinking about what I could make next for you guys, I have a ton of ideas, but lemon shot to the top of my list.  I saw a pink lemonade cake in one of my vintage cookbooks and thought about bringing that back in cupcake form, but a Google searched turned up a billion people who have already done that. 😦 But don’t be sad for me, I thought of something better!

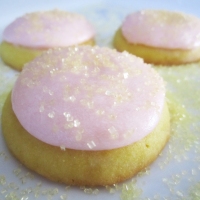
I started thinking about cookies ( I actually like cookies mores than cupcakes!) and then I decided I should throw Strawberry up in the mix. So, I came up with these Strawberry Lemonade Sugar Cookies, a lemony sugar cookie topped with strawberry icing and yellow sugar crystals.

I chilled the dough for about 30 minutes before baking and the dough was such a pleasure to work with. So many sugar cookie recipes I have tried left me with sticky dough covered hands, even after chill time, I hate that!  After baking, I could not wait to try one, I didn’t know what to expect. They were absolutely delicious, even without the icing and the texture is AMAZING. Success on the first try, I love that! Hooray! 🙂

Nothing screams summer like Lemonade and Strawberries, these are the perfect cookies for summer get-togethers, tea time or just ’cause.  Whip some up today, I know that you are dying to try them, I would be too.  If you don’t feel like making the icing, you could always just dust them with powdered sugar and call it a day. Here is my original recipe for these lemony little yum-yums…

STRAWBERRY LEMONADE SUGAR COOKIES

Yield: 4 dozen 2″ cookies

LEMONADE SUGAR COOKIES

2 sticks (1 cup) unsalted butter

3/4 cup sugar

2 tsp lemon zest

2 tsp lemon juice

2 cups all purpose flour

1 tsp baking powder

1/8 tsp salt

1 egg

1 tbsp milk

20 – 24 drops of yellow food coloring

Preheat your oven to 350. Cream together your butter and sugar; then add vanilla, lemon zest and lemon juice.  Add egg, beat until combined and stir in the milk.  Dump the dry ingredients into the wet a little at a time, combine. Add your food coloring and mix until the color is even throughout. Chill for about 30 minutes. Shape into 1″ balls and place on ungreased cookie sheet. Press them down to flatten them just a little. Bake for 8-10 minutes.  Remove from oven and let cool for a few minutes on the pan, then remove to rack to finish cooling.

STRAWBERRY ICING

1 stick (1/2 cup) unsalted butter

2 1/2 cups powdered sugar

2 tbsp milk

2 tsp strawberry extract

red food coloring (optional)

Cream together butter and sugar, adding the powdered sugar about 1/2  cup at a time. Add milk and blend until smooth. Add strawberry extract and blend until color is even throughout. If you would like it more pink, add red food coloring a little at a time until desired color is reached. I put the icing in a piping bag and piped a little circle on the top of each cookie, be careful here, it spreads! Don’t put too much or it will run down the sides (unless that’s the look you’re going for).  Finish with yellow sugar crystals

The icing will harden, but not enough to stack them without messin’ them up.

DON’T FORGET TO ENTER MY CRAZY AWESOME GIVEAWAY!!!

Scroll down a couple of posts or click the image below to go directly to my giveaway.

xox

Britt

GIVEAWAY!!!

26 Jun

Yes, I’m hosting an CRAZY AWESOME giveaway already. What do I want in return you may ask? Your help for me to reach my goal of 500 subscribers. WHOA! That’s a lot of people, but I know you can do it. Tweet, Facebook, Reblog, tell your Grandma, smoke signal… Heck, if you can get a photo of yourself sending a smoke signal, I’ll give you 25 extra entries! If you want in on this – and I know you do – you gotta subscribe/follow. I am offering the opportunity for you to earn extra entries below… YOU HAVE TO BE A FOLLOWER/SUBSCRIBER TO WIN!

Complete as many of these quests as you choose or just leave a comment below (don’t forget to leave your email!) for one entry…

1. Subscribe to my email updates!

2. If you haven’t already, please “Like” Baking Up Trouble on Facebook (You can find my Facebook “Like” button in the sidebar to the right ——>; Now post about my giveaway, make sure to include a little linky-loo back to my blog.

3. Follow me on Twitter @BakingUpTrouble and Tweet about my giveaway.

4. Follow me on Instagram, BakingupTrouble and repost my giveaway photo and details on Instagram for all your followers to see.

5. Refer a friend. Once they become a follower tell them to leave a comment saying you referred them.

6. And last but certainly not least… Reblog this.

YOU HAVE TO BE A FOLLOWER OR SUBSCRIBER AND LEAVE A COMMENT BELOW TO BE ENTERED INTO THE GIVEAWAY.

The goods…

Are you feeling motivated yet? 😉 Good luck and get to work! Don’t forget to leave a separate comment for each quest that you complete!

xox

Britt

Rocky Road Cookies

26 Jun

Let me start out by saying, these cookies are Bomb.com and so is Isa Chandra Moskowitz. If you don’t know who she is, you can find out more about her at The Post Punk Kitchen. Vegan or not, her recipes produce some of the most original and delicious things I have ever had the pleasure of eating. When I saw these Rocky Road Cookies on the cover of her book, Vegan Cookies Invade Your Cookie Jar, I knew they would be the first recipe I tested from it. These cookies are chock full of gooey, chocolatey goodness and your cookie jar will probably be empty as fast as you fill it up. Now, since I am not Vegan, I may have de-Veganized her cookies a little (Isa would probably choke me out if she read this…) but here is my adaptation of her fantastic Rocky Roads.

Rocky Roads

Rocky Roads
yield: 2 dozen

Adapted from: Vegan Cookies Invade Your Cookie Jar

1/2 cup milk
2 Tbsp ground flax seeds (I believe this is equivalent to one egg if you don’t have these.)
1/2 canola oil
1 1/4 cup sugar
2 tsp vanilla extract
1 1/2 cups plus 2 Tbsp all purpose-flour
1/2 cup cocoa powder
1/2 tsp baking soda
1/4 tsp baking powder
1/2 tsp salt
1/2 cup chocolate chunks (or chips)
1/2 cup white chocolate chips
1/2 cup roasted almonds, lightly salted

1. Preheat oven to 350 degrees.

2. In a large bowl, combine milk, flax seeds, oil, sugar and vanilla. Mix well until blended and smooth. Stir in the flour, cocoa, baking soda, baking powder and salt. Stir to form a thick, wet dough but do not over-mix. Fold in all the goodies now, chocolate chunks, white chocolate chips and almonds.

3. Drop about 2 Tbsp of dough onto a baking sheet 2 inches apart, cookies will spread.

4. Bake for 8-10 minutes until spread and cracked on top. Let them cool on the baking sheet for 5 minutes and then transfer to wire racks to finish cooling.

Rocky Roads waiting to be devoured.

A little something for those of you that are paying attention, I will be announcing an awesome giveaway soon, so stay tuned!!!

xox

Britt

Quote

Blueberry Scones with Lemon Glaze

24 Jun

So I had some fresh blueberries that I needed to use up and I’m kind of sick of muffins… Scones seemed like a much better idea, especially since they don’t have much sugar. I Googled Blueberry Scones and used the first recipe that came up. They just so happened to have a glaze, which made up for what the Scones lack in sugar. Good news though, that glaze turned my Scone-Hating hubby into a Scone Worshipper. These are hands down one of the best things I have baked or tasted in my entire life. Try them you must or consume you the Dark Side will.

Recipe Courtesy Tyler Florence, FoodNetwork.com

Blueberry Scones with Lemon Glaze

Ingredients
Blueberry Scones:

2 cups all-purpose flour
1 tablespoon baking powder
1/2 teaspoon salt
2 tablespoons sugar
5 tablespoons unsalted butter, cold, cut in chunks
1 cup fresh blueberries
1 cup heavy cream, plus more for brushing the scones

Lemon Glaze:

1/2 cup freshly squeezed lemon juice
2 cups confectioners’ sugar, sifted
1 tablespoon unsalted butter
1 lemon, zest finely grated

Directions

Preheat the oven to 400 degrees F.

Sift together the dry ingredients; the flour, baking powder, salt, and sugar. Using 2 forks or a pastry blender, cut in the butter to coat the pieces with the flour. The mixture should look like coarse crumbs. Fold the blueberries into the batter. Take care not to mash or bruise the blueberries because their strong color will bleed into the dough. Make a well in the center and pour in the heavy cream. Fold everything together just to incorporate; do not overwork the dough.

Press the dough out on a lightly floured surface into a rectangle about 12 by 3 by 1 1/4 inches. Cut the rectangle in 1/2 then cut the pieces in 1/2 again, giving you 4 (3-inch) squares. Cut the squares in 1/2 on a diagonal to give you the classic triangle shape. Place the scones on an ungreased cookie sheet and brush the tops with a little heavy cream. Bake for 15 to 20 minutes until beautiful and brown. Let the scones cool a bit before you apply the glaze.

You can make the lemon glaze in a double boiler, or for a simpler alternative, you can zap it in the microwave. Mix the lemon juice with the confectioners’ until dissolved in a heatproof bowl over a pot of simmering water for the double-boiler method, or in a microwave-safe bowl. Whisk in the butter and lemon zest. Either nuke the glaze for 30 seconds or continue whisking in the double boiler. Whisk the glaze to smooth out any lumps, then drizzle the glaze over the top of the scones. Let it set a minute before serving.

xox

Britt