Tag Archives: cooking

Cherry Limeade Bars

17 Jul

It’s hot lately and if I still drank soda, I’d go get me a Cherry Limeade from Sonic. If you’ve been around these parts before, you may have noticed that I love citrus, much more so than chocolate and cherry-lime is pretty much a win-win all around.  My favorite part of a Cherry Limeade lies at the bottom of the cup, eating the soda soaked lime and cherry, it’s like a reward for drinking all that soda, I like that.

I’ve been thinking of baking up a Cherry Limeade dessert for a few weeks now and a Google search turned up that Cherry Limeade cupcakes have been done and done and done! So I decided on some bars, it actually bakes up like a cake, so you could easily whip up some frosting for it and serve it like that, but I am not real big on baking cakes and such. I prefer portability and I like dessert that I can hold in my hand!

This recipe is reeeealllly simple and fuss-free. The Cherry pie filling is swirled through the lime batter straight outta the can. Some of it sinks to the bottom and leaves a nice, gooey layer of cherry goodness on the bottom of the bars. Yeah, and the contrast is pretty cool too!  Now, these guys are VERY gooey straight out of the oven, so they need a trip to the fridge (or freezer) before you serve them.

Without further ado, let me present to you, my recipe for Cherry Limeade bars…


CHERRY LIMEADE BARS

Yield: 2 Dozen bars or 9 x 13 cake

2 cups all purpose flour

1 tsp baking powder

1 tsp baking soda

1 tsp salt

1 1/2 cups sugar

3 oz package lime gelatin

1/2 cup canola oil

2 eggs

1 cup milk

2 tsp vanilla extract

1 tbsp lime juice

21 oz can cherry pie filling

Preheat oven to 350 degrees. Combine the first 6 ingredients in a large bowl.  Slowly add in your canola oil until fully blended then beat in eggs one at a time. Next, add milk, vanilla and lime juice; mix until smooth.  Pour into greased 9 x 13″ pan (I used glass).  Dump cherry pie filling on top in spoonfuls and using the spoon swirl it through the lime batter. Bake for 30-35 minutes or until done.  Remove to rack to cool and then refrigerate until completely cool and firm enough to cut into bars.


You definitely gotta try these if you’re a Cherry Limeade fan, or even if you’re not (you might become one)! Summer isn’t over yet, so bake it up and celebrate!

xox

Britt


Don’t forget to check out my Crazy, Awesome Giveaway! YOU could be the big winner! Click the photo below to be taken straight to the giveaway or just keep scrolling down and enjoy the scenery on your way there. 🙂

Chocolate “Pretzels” and Mini S’mores

9 Jul

They might look like Chocolate-Dipped Pretzels at first glance, but these my friends, are not. These are cookies that are shaped like pretzels, how awesome is that?

The basic cookie is something I dug up from a vintage cookbook and then I decided they were way too boring. I melted some milk chocolate and dipped the fronts and then covered them all that junk. The toppings are kind of donut-inspired because 1. It’s what I had in the cabinet, 2. I was really hungry for donuts yesterday but never got one. 😦

This was a really fun and easy cookie to make and I’m sure all of you have the basic ingredients on hand. The dough is VERY easy to work with, which I love. Be creative with the toppings, clean out your cabinets! Leave a comment below and tell me what you would top your Chocolate “Pretzels” with!

CHOCOLATE “PRETZELS”

Yield: 2 dozen cookies

1/2 cup unsalted butter, softened

1/2 cup sugar

1/4 cup unsweetened cocoa powder

1 egg

1/4 cup water

1 tsp vanilla

2 cups all-purpose flour

Combine butter, sugar and cocoa powder; beat in egg, water and vanilla. Gradually add flour; mix well.

Divide dough into 24 pieces. With hands, roll each piece to a 12-inch rope on lightly floured surface. Shape each rope into a circle, crossing about 2 inches from ends of rope. Twist rope at point where rope crosses. Seal ends of rope to center of opposite side of circle, forming a pretzel shape. Place on ungreased cookie sheet. Bake at 350 degrees for 10 minutes. Cool on rack.

When they cool, top them with whatever your heart desires!

So, this little treat was from last week, but I thought they were so cute, I just had to share.  I bought my kids some mini grahams when I was grocery shopping, the kids were begging for a treat so I pulled them out. Then I remembered I had chocolate chunks and mini marshmallows leftover from the Nice Dreams Cupcakes, so we made Mini S’mores, aren’t they adorable?  Here’s whatcha do:

I put an even number of graham crackers on a microwaveable plate and for each pair put a mini marshmallow on one and a chocolate chunk on the other (if you use chocolate chips, you might need to put 2-3). I microwaved them on high for 30 seconds, when you pull them out the marshmallow should be puffed and ready to explode, if using chocolate chunks it probably won’t be melted but press the two together and they should fuse right away. Enjoy!

DON’T FORGET TO ENTER MY CRAZY AWESOME GIVEAWAY! Scroll down or click HERE to enter and see how you can earn extra entries! The sooner we get to 500 followers, the sooner the three prizes below could show up in YOUR mailbox, so REPOST, REPOST, REPOST!

xox

Britt


Nice Dreams Cupcakes

28 Jun

WARNING: THESE CUPCAKES ARE NOT FOR THE FAINT OF HEART!

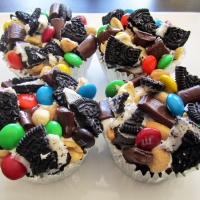
Yes! There’s a cupcake under there!

Let me just start out by saying I do NOT do drugs but I DO love stoner movies. Yes, I said it, I’m not afraid.

Cheech and Chong movies were my first ventures into stoner cinema. My Dad, who was so strict in other weird ways, strangely let me watch them at an inappropriately young age. I love stoner movies because… I love to laugh. I love a stupid sense of humor. I love nonsense. I love to get the giggles sooo bad that I feel like I’m high right along with ’em, then I remember that I don’t smoke pot. (I know you know what I’m talking about.)

Anyways, this cupcake is a tribute to Cheech and Chong and the laughs we have shared over the years. I present to you…

Nice Dreams Cupcakes.

A big mess of sweet and salty goodness and marshmallowy goo on top of a delicate vanilla cupcake.

Here I am presenting it to you…

Obviously this cupcake is named after the Cheech and Chong movie, but the name is sort of a contradiction. Eat more than one of these suckers and I can guarantee you’ll have awful nightmares from the blood sugar spikes. But I really couldn’t call them Awful Nightmare Cupcakes, some folks might get the wrong idea. And Nice Dreams may not have been the best C&C movie but I didn’t want to jinx myself by calling them Up In Smoke Cupcakes either.

Are you ready to find out how you can have your very own Nice Dream Cupcakes?

First, you’re going to make the cupcakes, I’m sharing with you my original recipe for Basic Vanilla Cupcakes. They’re awesome and don’t get any mean ideas because they are in the cookbook I’m working on. More about that later.

You will also need:

Mini Marshmallows

Creme-Filled Chocolate Sandwich Cookies, broken (Oreos)

Semisweet Chocolate Chunks (or chips)

Salted Peanuts

Candy-Coated Chocolate Candy (M&M’s)

Foil Cupcake Liners (an extra-special touch)

Basic Vanilla Cupcakes

Yield: 1 Dozen

Light and airy with a subtle vanilla kick, this baby is the perfect foundation for your non- chocolate cupcakes.

1 cup all-purpose flour

½ tsp baking powder

½ tsp baking soda

½ tsp salt

¾ cup sugar

¼ cup canola oil

1 egg

½ cup milk

2 tsp vanilla extract

What do I do now?

First, preheat your oven to 350 degrees F. (don’t forget to use an oven thermometer, ovens can be real jerks sometimes) Make sure you have everything you need out and ready to rock. Combine all your dry ingredients in a medium mixing bowl. Slowly pour in your canola oil and mix thoroughly, it will look (and sound) like wet sand once it’s full blended. Add the egg and beat it for a minute or so, always remembering to scrape the sides and bottom of the bowl. Pour milk into a measuring cup and mix in the vanilla. Add it to your “wet sand” a little at a time, beating well after each addition. Once all the milk mixture is incorporated, it should be the consistency of pudding that has not yet set. Make sure you have your cupcake pan prepped with liners and fill them up about halfway with your batter. Before you pop them in the oven, check your thermometer to make sure it is at the correct temperature and bake 16 minutes or until the good ol’ toothpick test comes out clean.

After you get the cupcakes all baked up, you gotta get the marshmallows all melted and spread on there like frosting. Now marshmallows are very sticky business, so I tried out three different methods to make life easier for you. Aren’t I nice? I microwaved them, heated them on a stove and used the oven. Long story short, the oven is the easiest and cleanest way to go. As soon as those suckers are done baking, put about 8 mini marshmallows on top and pop ’em back in the oven for a minute or two. Watch them closely and heat them just until you can take a knife and spread that goo around. Or you can be a slacker and buy a jar of Marshmallow Creme (I wish I did) .

Now, once you get that done, just dump all the other junk on top, easy peasy. You can thank me later.

These cupcakes are completely legal, despite the name.


A little word of advice before I go, it may not be a very good idea to operate a motor vehicle or heavy machinery after consuming these. I think it would be safe to vote in my poll though…

xox

Britt

If you haven’t yet, please check out my previous post for details on the awesome giveaway I’m hosting!

GIVEAWAY!!!

26 Jun

Yes, I’m hosting an CRAZY AWESOME giveaway already. What do I want in return you may ask? Your help for me to reach my goal of 500 subscribers. WHOA! That’s a lot of people, but I know you can do it. Tweet, Facebook, Reblog, tell your Grandma, smoke signal… Heck, if you can get a photo of yourself sending a smoke signal, I’ll give you 25 extra entries! If you want in on this – and I know you do – you gotta subscribe/follow. I am offering the opportunity for you to earn extra entries below… YOU HAVE TO BE A FOLLOWER/SUBSCRIBER TO WIN!

Complete as many of these quests as you choose or just leave a comment below (don’t forget to leave your email!) for one entry…

1. Subscribe to my email updates!

2. If you haven’t already, please “Like” Baking Up Trouble on Facebook (You can find my Facebook “Like” button in the sidebar to the right ——>; Now post about my giveaway, make sure to include a little linky-loo back to my blog.

3. Follow me on Twitter @BakingUpTrouble and Tweet about my giveaway.

4. Follow me on Instagram, BakingupTrouble and repost my giveaway photo and details on Instagram for all your followers to see.

5. Refer a friend. Once they become a follower tell them to leave a comment saying you referred them.

6. And last but certainly not least… Reblog this.

YOU HAVE TO BE A FOLLOWER OR SUBSCRIBER AND LEAVE A COMMENT BELOW TO BE ENTERED INTO THE GIVEAWAY.

The goods…

Are you feeling motivated yet? 😉 Good luck and get to work! Don’t forget to leave a separate comment for each quest that you complete!

xox

Britt